Whether your boat has always been devoid of a head, or for whatever reason your existing waste system isn’t up to snuff, you might be thinking about buying and installing a new one.
You’ll want a system that’s easy to use, reliable, and meets all modern legislation with regard to waste management.
If this is what you’re after then you’re in the right place. This guide is designed to be a one stop shop, both to guide you through what you need to buy for a marine waste system, and how to fit it.
I’ll be breaking everything down step by step to ensure you are guaranteed success with this project.
System Basics
First things first, a bit of background on boat toilet systems.
There are a number of possible configurations for how sewage is handled on board boats, including directly discharging it through the hull, processing it with an onboard treatment system, and by far the most accepted configuration which I’m going to cover here: using an onboard black water storage tank for pump out on shore.
Although most jurisdictions allow sewage to be discharged directly into the sea when a boat is over three miles offshore, unless you’re into pretty serious excursions offshore for several days at a time you probably won’t have much use for a configuration that doesn’t feature a storage tank.
With a storage tank fitted it’s not a great deal more work to include a diverter valve and pump out fitting when the rules allow you to discharge at sea, so I’ll cover that here as well.
Types of Toilet
Before we go too much further, you’ll want to give some thought as to the type of toilet you wish to use. Broadly speaking your options are as follows:
- Cassette toilet – akin to the sort of thing you might use when camping, a toilet with an integral waste tank ‘cassette’ that must be manually removed and emptied
- Gravity toilet – a simple design wherein the toilet sits directly over the waste tank. The tank should be pumped out regularly to avoid bad smells emanating from the tank
- Electrically pumped toilet – the most sophisticated option where an electric macerator pump transfers waste from the toilet into a holding tank, which may be positioned a fair distance from the toilet
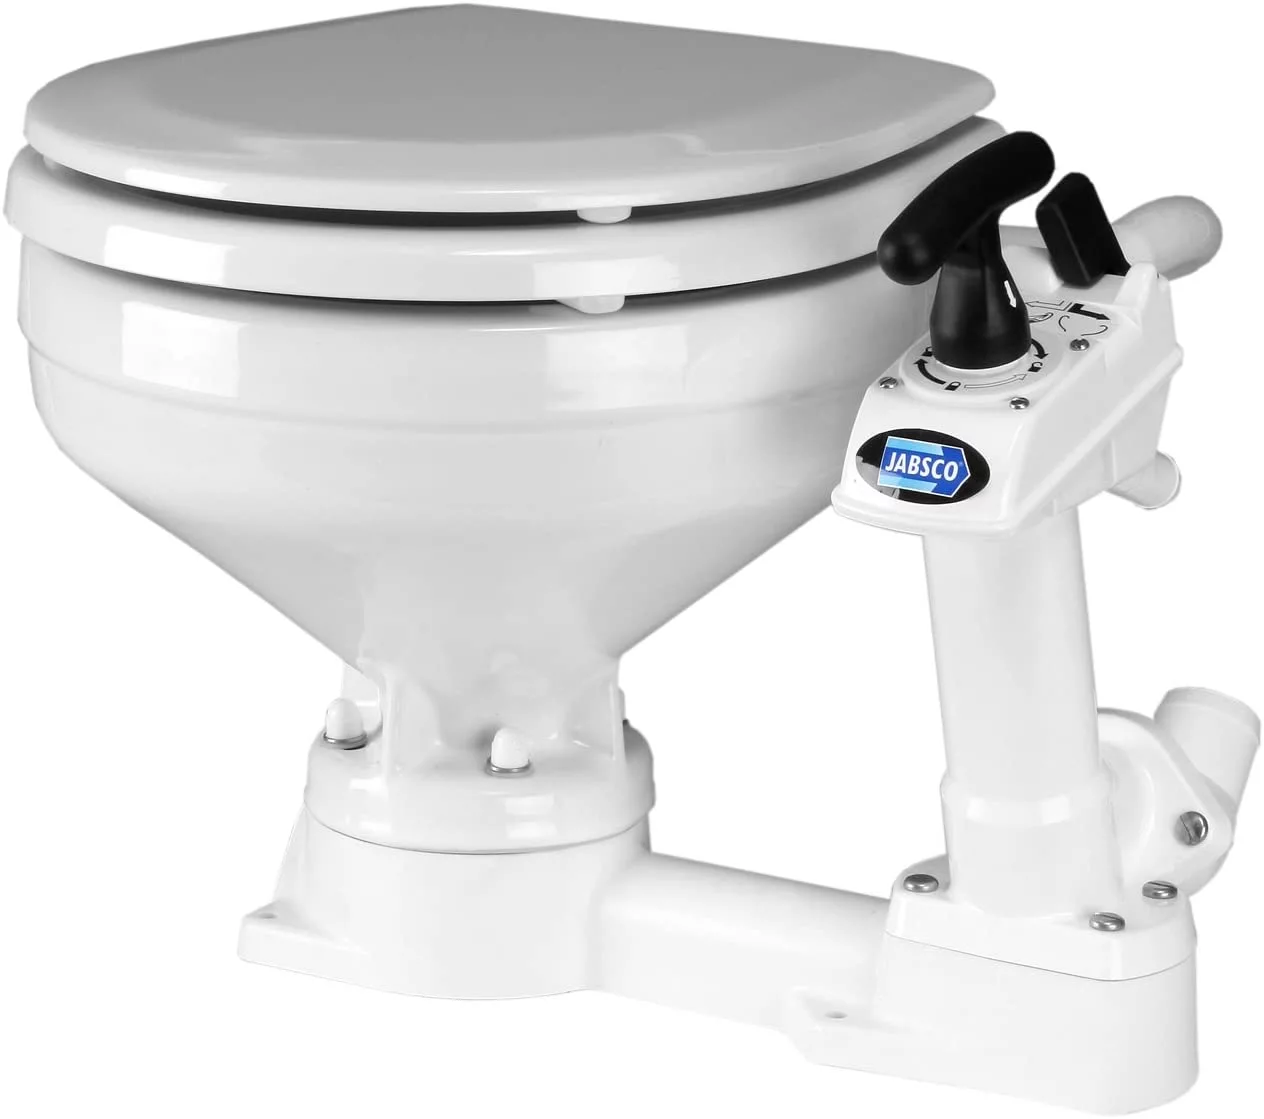
- Vacuum toilet – In my opinion the best all round option. Waste is sucked into the holding tank with the use of a manual vacuum pump, avoiding the need for an electrical system
I’ll be covering the installation of a vacuum toilet in this case, but the same plumbing principles apply to electric toilets as well.
Whilst gravity fed and cassette toilets certainly work, they’re a pretty rudimentary solution, and stand a much greater chance of venting bad smells than electrical or vacuum toilets. Not generally something you want if you can help it!
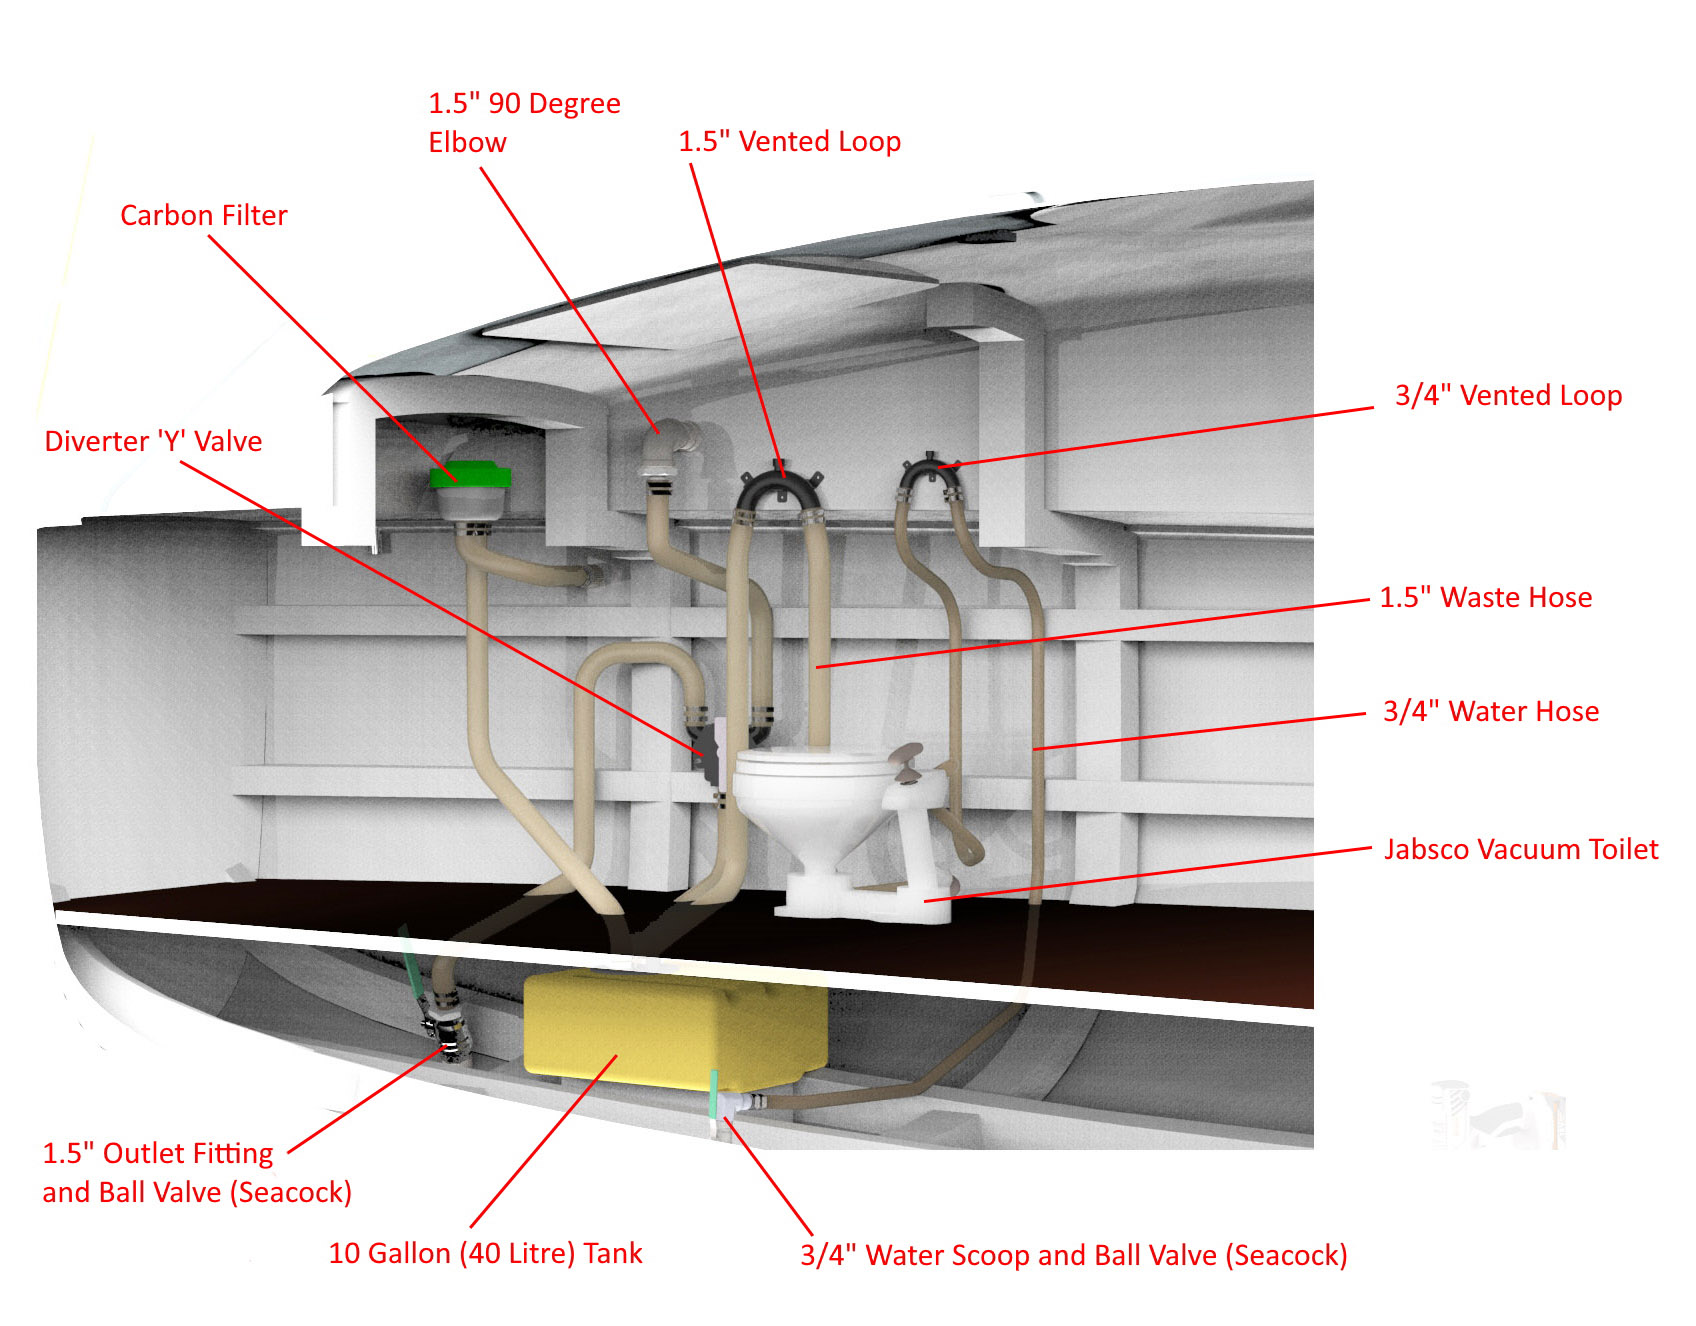
Vacuum Toilet and Waste Tank System Overview
Tools Needed
- Cordless Electric Drill
- 1 1/8” Hole Saw (for 3/4″ scoop and shell/scupper vent)
- 2” Hole Saw (for 1.5″ scoop and pump out fittings holes)
- Box Cutter/Stanley Knife (for cutting hoses)
- Standard set of drill bits (1/16” through ¼” or 1.5mm to 6mm or so)
- Standard screwdriver bits and or/screwdriver set
- Rag and acetone (or other surface cleaner) for cleaning areas of hull prior to drilling/sealing
- Tape Measure
- Masking Tape
- Pencil/Pen
Parts Needed
- Jabsco Twist n’ Lock, Manual Marine Toilet
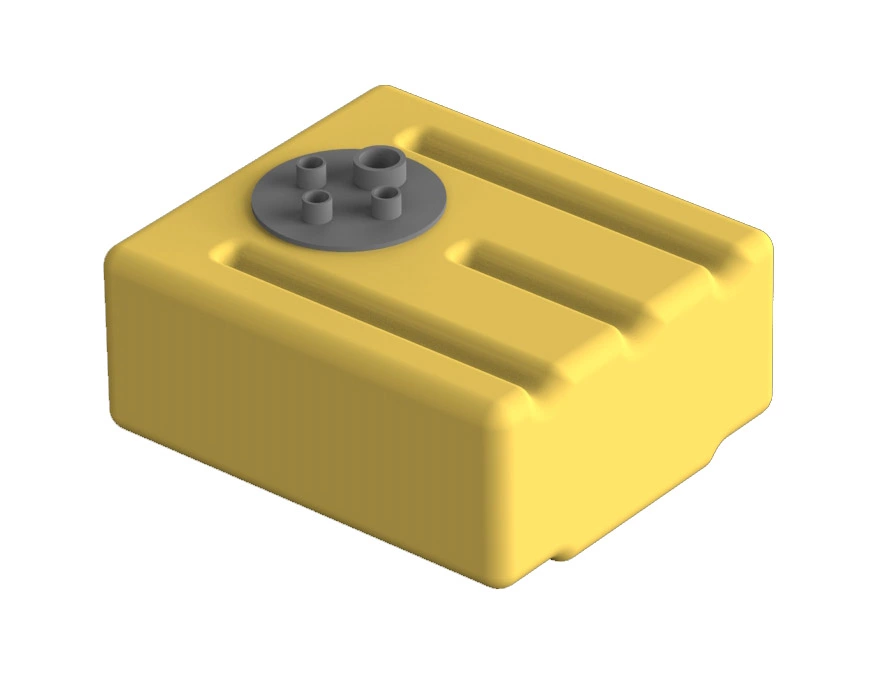
- 10 gallon (40 liter) waste tank (although the size is up to you, I recommend something of roughly this size as the industry standard)
- Carbon filter to be placed in tank vent line
- 3/4″ plastic vented loop
- 1.5” plastic vented loop
- 1.5” plastic elbows (if sharp bends in hose lines are required)
- Pump out fitting for 1.5” to 2” hose
- Shell/scupper vent 1.5”
- Hosetail 1.5” NPT x 1.5” tail
- Hosetail 3/4″ NPT x 3/4″ tail
- ¾” Hull Scoop Intake
- ¾” Ball Valve
- 1.5″ Ball Valve
- 1.5” Sanitation/Waste Hose
- 3/4″ Water/Bilge/Sanitation Hose
- Diverter ‘Y’ Valve 1.5″
- Pipe or ‘Jubilee’ Clips to suit 1.5″ & 3/4″ hoses
- Sikaflex 291i sealant (available in either black or white)
- Silicon Sealant
- Hose ‘P’ Clips to fix hoses to bulkheads and side shells
- Toilet Roll Holder (always useful!)
Fitting the Toilet:
Step 1. Remove The Old System or Find a Home For The New One
If you’re simply replacing your system this first task is in some ways more straightforward, as you know exactly where you’re going to fit your head.
If you’re fitting a head from scratch you might be wondering where the best place to locate it is. Traditionally the toilet has been placed towards the bow, hence or ‘head’ of the boat. Chances are the layout of your vessel will lend itself to a similar arrangement, but there’s no real hard and fast rule.
The important thing is that you’re happy with where you choose – if you’ve got a view of a toilet when you’re relaxing in your cabin it might not make for the best experience!
Ideally you’ll have a bulkhead you can fit the head system behind, but if not you’ll need to think about how to conceal the head, both from an aesthetic and privacy perspective.
You might need to think about how best to ‘box in’ the toilet once fitted, ie. hiding the hoses behind removable panels etc.
The waste storage tank that we’ll be using can in theory be positioned in a different compartment to the toilet itself, but bear in mind you will have to run longer hose lines, which may involve additional bulkhead penetrations and a harder time inspecting the system at a later date.
Step 2. Dry Fit the Toilet and Waste Tank
The toilet and waste tank are the two bulkiest items within the system, so it will pay to make sure they defintely fit where you intend to fix them, without getting in the way of anything or anyone else.
Equally you’ll want to make sure nothing is in your way when sitting on the toilet. Having to tilt your head to one side to avoid a cupboard is not going to be much fun after the tenth time doing so!
When it comes to the waste tank itself, you’ll find there are different models available, some designed to sit on deck (or below it), and others which are designed to sit vertically on a bulkhead. Both have their advantages, with a below deck tank being out of view, but requiring more structural butchery to plumb in, whilst the bulkhead mounted type is easier to access for plumbing and maintenance, yet it will take up accomodation space.
Once you’re happy with the location of these items, mark off where they will sit with the aid of a pencil or masking tape.
At this point it’s also worth getting a rough idea of where the side shell penetrations for the pump out fitting and tank vents will go, as well as the locations for the vented loops and diverter valve, as these will define where the hoses run to within the accommodation space.
Keep in mind that the seacocks on the raw water and waste outlet connections should be accessible at all times, as they should be closed when the toilet is not in use for safety reasons.
Don’t drill anything off at this point, just use your best judgement to decide where they should go and mark accordingly.
Step 2. Drill off the hole for the hull Sea Water (Raw Water) Intake
Once you’ve determined exactly where your toilet is going to sit you’ll want to find a suitable location for the sea water intake.
Now, on a system that features the option to discharge the sewage directly into the sea you would want to position the sea water intake on the opposite side of the hull to the outlet, or else risk sucking on contaminated water into the intake.
In a purely pump out system this isn’t strictly necessary, but it’s still best practice, in case you wish to add a direct discharge outlet at a later date.
So in short the toilet outlet should be on one side of the hull and the seawater intake on the other.
You’ll also need to make sure the inlet isn’t near other intakes (engine cooling, air con etc)
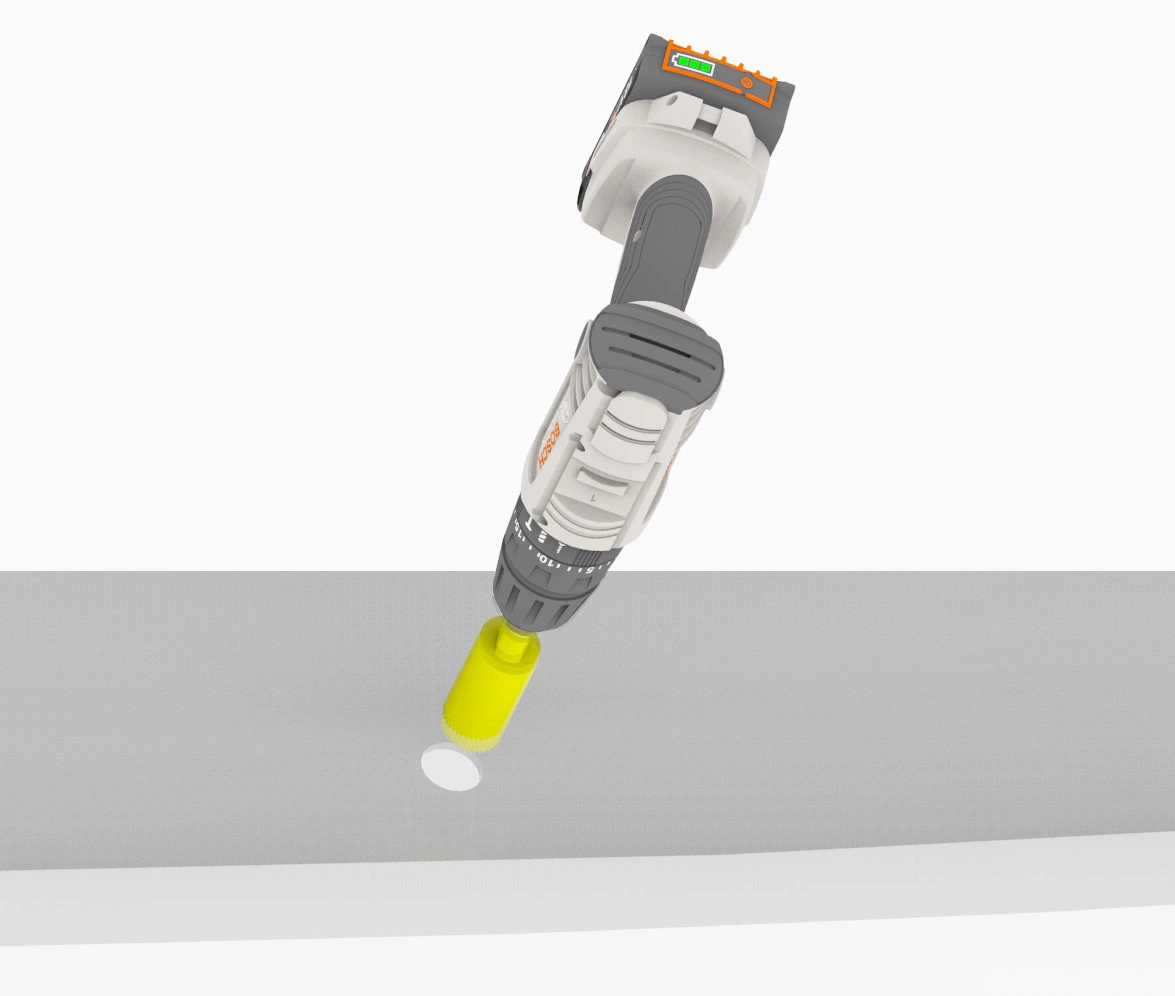
Once you’ve settled on a location, drill a pilot hole using a ⅛” or 3mm drill bit then use a 1 1/16” or 30mm hole saw to drill a hole through the hull.
You can then fit the intake scoop through the hull, taking care to orient it correctly such that water flows into the scoop (in other words with the thin end facing forwards)
Also keep in mind at this point where your hose runs will go when they come up from below deck, into the vented loop and into the toilet. You’ll need suitable places to fix the hose to the hull sides/bulkheads.
Once you’re happy with your location the scoop can then be bonded and sealed to the hull using Sikaflex 291i.
The 3/4″ ball valve (seacock) can now be fitted to the scoop, and the 3/4″ hosetail fitted to the ball valve.
Remember: When working with tapered threaded fittings no further parts are required to make a secure connection (although PTFE tape or thread locket can be used). Parallel threads MUST be sealed with the addition of an O-ring/bonded seal.
Step 3. Drill Off the Hole For The Waste Discharge Outlet
Use exactly the same method as described above, keeping in mind the relative position to the raw water intake and the position of hose runs.
You’ll need to drill a ⅛” or 3mm pilot hole, and then use a 52mm or 2″ hole saw to drill the fitting hole.
Fit and secure the 1.5″ water scoop, before connecting the 1.5″ ball valve and hosetail.
Step 4. Run Hoses From the Inlet And Outlet And Firm up Where the Other Items Will go
3/4″ Raw Water Hose
Given that the intake side of your system should in theory not come into contact with and waste contaminated water, you can use a regular raw water hose for this purpose – the same type of thing you would use for a bilge pump.
If you’re in the US I recommend ‘Shields Rubber Series 250 Shieldsflex II’ hose, while for the UK market ‘Seaflow Fire Retardant Water Intake Hose’ is a good choice.
If you’re wondering why I don’t recommend a simple PVC hose instead, I believe it’s far better to buy something longer lasting that won’t be damaged by abrasion or contact with chemicals, the likes of which are almost guaranteed over the lifetime of a boat.
Estimate how much raw water hose you’ll need and cut it to size accordingly. Use the appropriate size hose clips to securely connect the hosetail of the raw water intake, vented loop and toilet connection. It’s always best practice to use 2 hose clips per connection.
Note: Ensure you tighten your hose clips sufficiently to avoid potential leaks!
1.5″ Sanitation Hose
When it comes to sanitation hose you could opt for a raw water hose, which will work well enough to a point. However in time there is the risk of the hose ‘sweating’, which means bad smells may be vented inside the boat, and the prospect of this is just generally not a pleasant thought!
Instead dedicated sanitation hose is the way to go, with Shields Rubber Poly X sanitation hose being a good choice for US customers, and Seaflow Waste Water Hose ideal for those in the UK.
Depending on your configuration you’ll need 5 or 6 lengths of sanitation hose, so bear this in mind when you’re estimating, as this will govern how much you need to buy. Always add at least 10% onto the figure you think you’ll need!
Note: Large hoses such as these can be pretty unwieldy and hard to bend. Wherever possible make your radii as large as possible.
Drill Floor/Bulkhead Penetrations The Hoses (if Needed)
If you’re running your hoses through the floor or a bulkhead, clearly you’ll need to drill holes to do so.
You’ll also need to consider how you will protect the hoses from rubbing against the edges of said holes and becoming damaged as a result. This can be as simple as sanding down any sharp edges, or wrapping some sort of lagging around the hose in the area where it passes through an aperture.
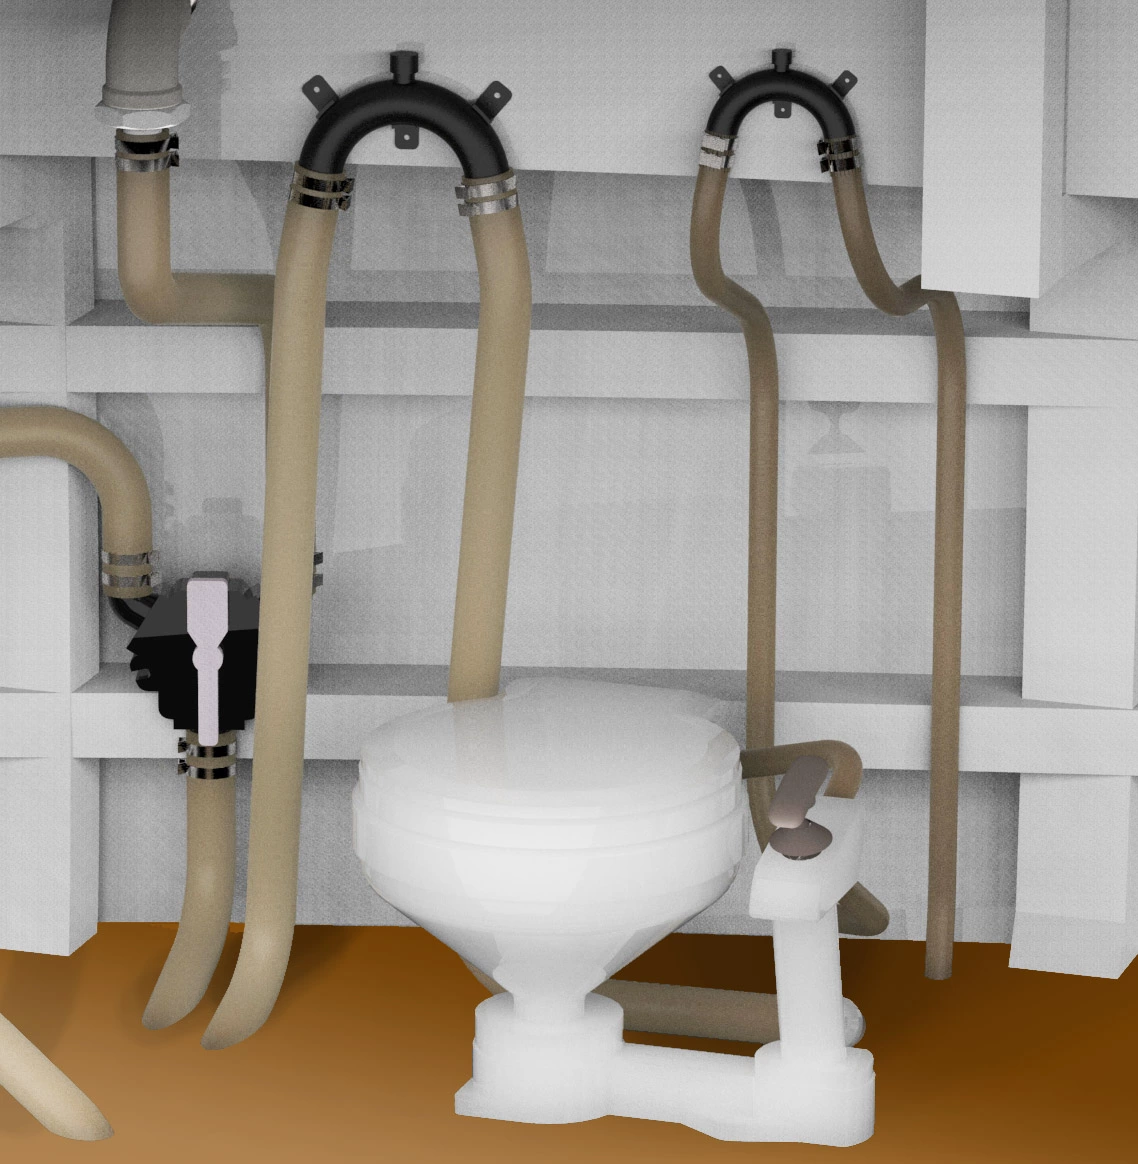
Vented Loops, Carbon Filter and Diverter Valve
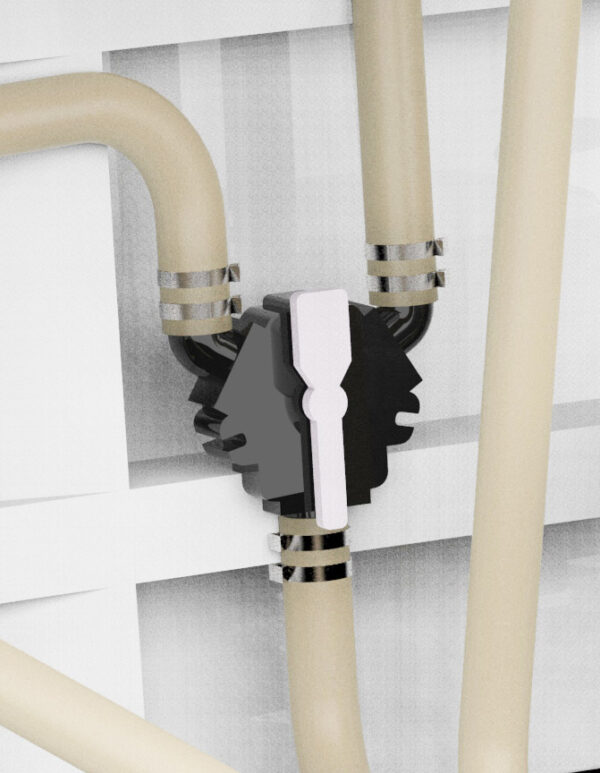
These items will need to fit on a bulkhead or side shell, such that they don’t obstruct the toilet or anything else.
With the vented loops it is important that they are high enough above the waterline that they will not overflow and backfill the toilet and waste tank, should the boat roll.
Whilst some people do not put a vented loop on the raw water intake line of the sytem, instead relying on the valves in the toilet to keep the toilet from overflowing, this is not advisable given that these valves may at times get jammed open as a result of some piece of rubbish or seaweed getting stuck.
The outlet side is much more critical, as water can freely flood back into the toilet.
Remember: If water is able to backflow into the system, the boat could flood and sink, which is suffice to say, an unpleasant and very dangerous situation!
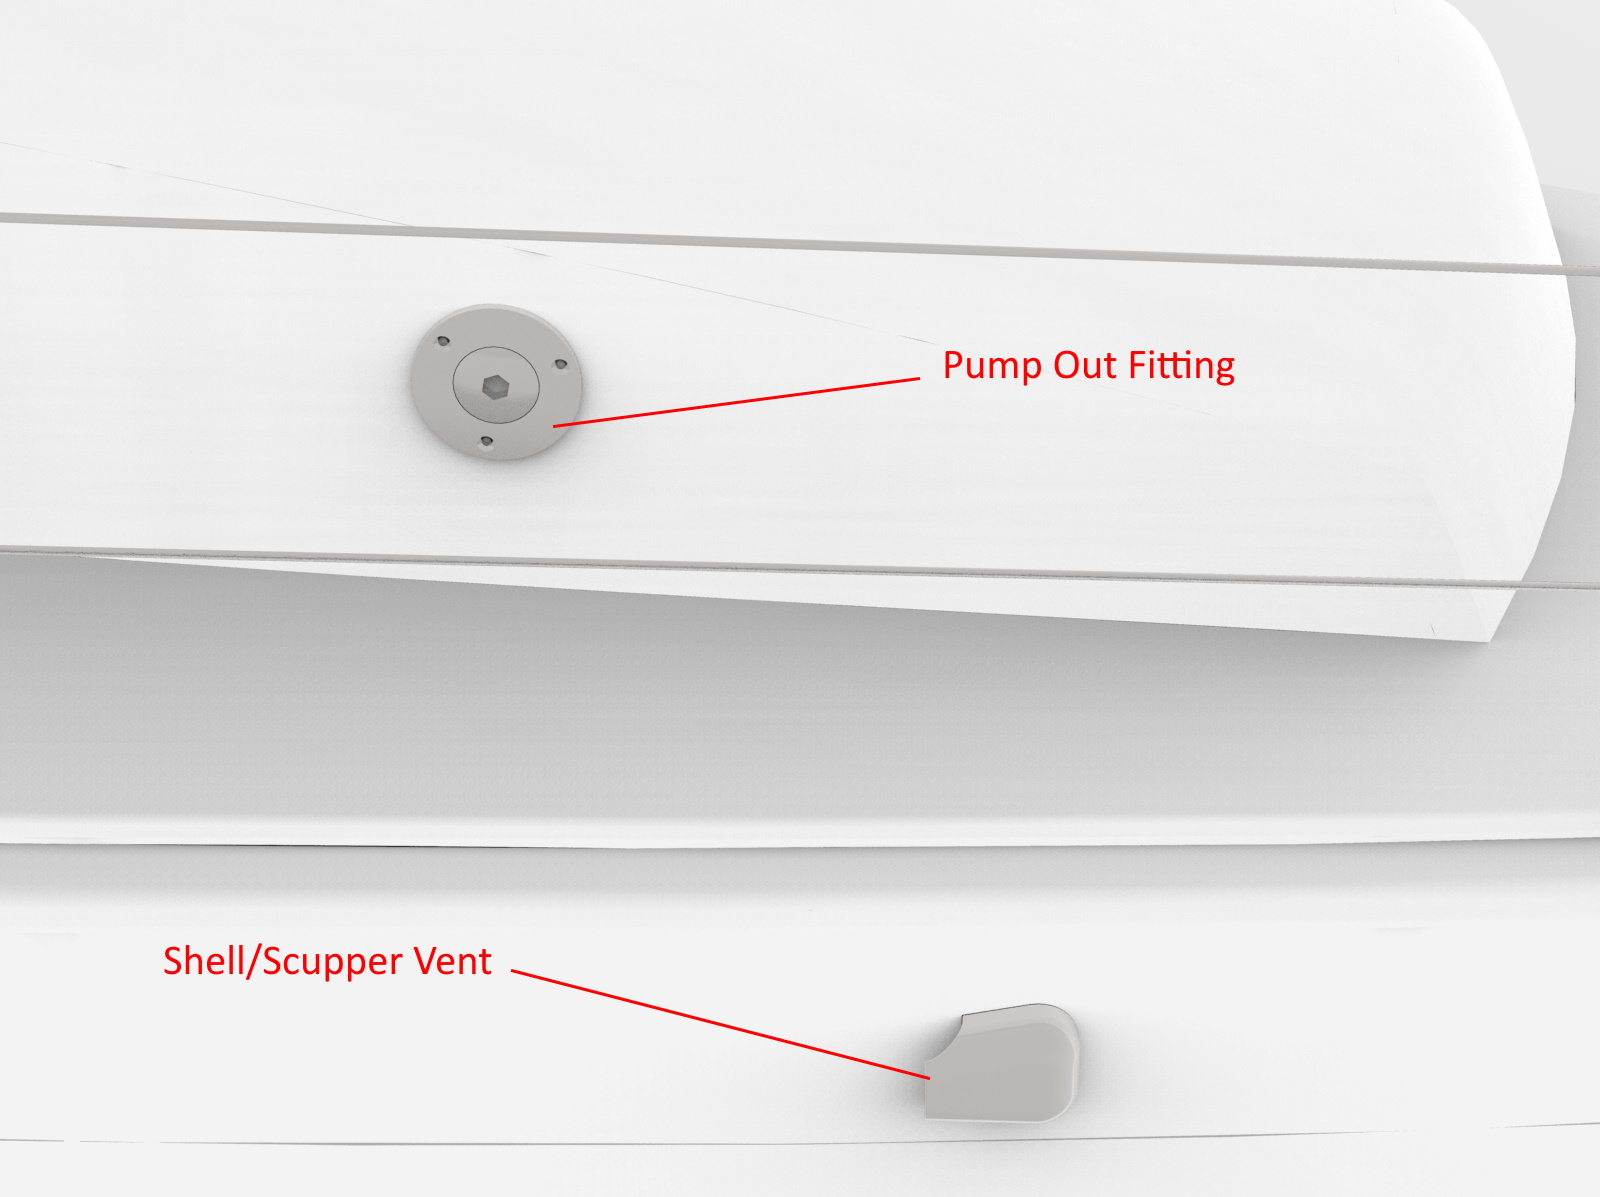
Side Shell External Items – Vent Fitting and Pump Out Fitting
When you’re happy with the positions of all the internal fittings and equipment you’ll be able to confirm exactly where the tank vent and pump out fittings should go on the side shell.
For the pump out fitting, clearly accessibility is the main concern, as it needs to be somewhere you are easily able to access comfortably, from standing height, from a pontoon or quayside.
I advise using a metal pump out fitting (typically chrome plated bronze), rather than a plastic one, as not only do these look better but they’re more resilient to being bashed repeatedly with a pump out hose.
As far as the vent goes, the most important thing is that, like vented loops in the hose line, this should be mounted high enough above the waterline such that water cannot enter the vent should the boat list.
Both of these parts are on the waste side of the system and will need to have 1.5″ threads. Consequently you’ll also need to use the 52mm/2″ hole saw to drill the fitting holes.
Fix The Toilet And Fuel Tank in Position
Drill off and fit the toilet to the deck using 4 x M8 or 5/16″ bolts or screws. The length of these will vary depending on the thickness of your deck panel. You’ll also need 8 washers and lock nuts to securely fasten the head.
There are a variety of ways of fixing the waste tank in place depending on the location and surrounding structure. Generally speaking the simplest solution is to use ratchet straps wrapped around the tank and some form of fixed structure, so that the tank can be removed for maintenance if required.
You may need to consider additional bracketry if no obvious fixing location exists for your tank.
Final Thoughts
I hope this article has given you a pretty good overview of what’s involved when installing a vacuum toilet system.
Clearly every project will be slightly different, and you’ll likely face unexpected problems which I haven’t covered here in detail, but hopefully you’ll be better placed to tackle them now that you know what your end goal should be.
I won’t go into too much detail as to the specifics of operating the toilet, as the manufacturer instructions do a good job of that, and they also give further information with regard to plumbing configurations and maintenance.
To reiterate a couple of important points before you set out on the water however:
- Ensure you test the system for leaks before use (using clean water alone!)
- Always keep the seacocks closed when at sea as an added safety measure in addition to the vented loops in the hose lines.
Thanks for reading, and good luck with your installation!